
There is nothing quite as unnerving as walking up to your own front door in pitch darkness, fumbling for keys while glancing over your shoulder. Whether you are looking to boost your home security or just want to stop tripping over the garden hose at night, motion-activated lighting is one of the best upgrades you can make. It’s efficient, it’s effective, and best of all, you don’t need to hire a pricey electrician to get it done. Learning how to connect a motion sensor light is actually a straightforward DIY project that most homeowners can tackle in a single afternoon.
In this guide, we are going to walk through the entire process. We won’t just throw technical jargon at you; we’ll break it down into simple, manageable actions. By the time you’re done reading, you’ll feel confident enough to grab your ladder and get that light shining. We’ll cover everything from safety precautions (which are non-negotiable!) to the nitty-gritty of wiring, ensuring your new setup is safe, code-compliant, and ready to welcome you home.

Step-by-Step Guide On How To Connect A Motion Sensor
Installing a motion sensor light is a rewarding task because the results are instant. However, because you are dealing with electricity, you need to proceed with care and patience. This guide assumes you are replacing an existing outdoor fixture, which is the most common scenario for DIYers.
Step 1: Gather the Right Tools for the Job
Before you even touch a switch, you need to make sure you have everything ready. There is nothing worse than being perched at the top of a ladder only to realize your screwdriver is back in the garage.
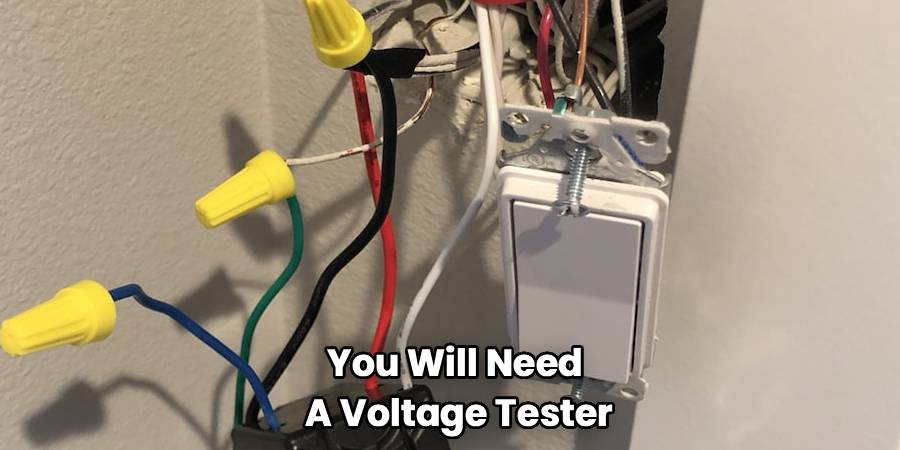
For a smooth DIY motion sensor light setup, you will need a voltage tester (this is crucial for safety), a Phillips and a flathead screwdriver, wire strippers, electrical tape, and a few wire nuts (though your new light kit likely came with some). You should also have some silicone caulk on hand to seal the fixture later, preventing moisture from getting into your electrical box. Having a sturdy ladder and a friend to hold it is also a smart move.
Step 2: Safety First – Cut the Power
This is the most critical step of the entire project. Never assume a light is off just because the switch is flipped down. Go to your home’s main breaker panel and find the circuit breaker that controls the outdoor light you are working on. Flip it to the “OFF” position.
Once you’ve flipped the breaker, go back to the light fixture and try the switch to ensure it doesn’t turn on. For absolute peace of mind, use your non-contact voltage tester. Hold it near the fixture to confirm there is zero current flowing. Dealing with “wiring a motion sensor light” is safe as long as the power is completely dead. Do not skip this check.
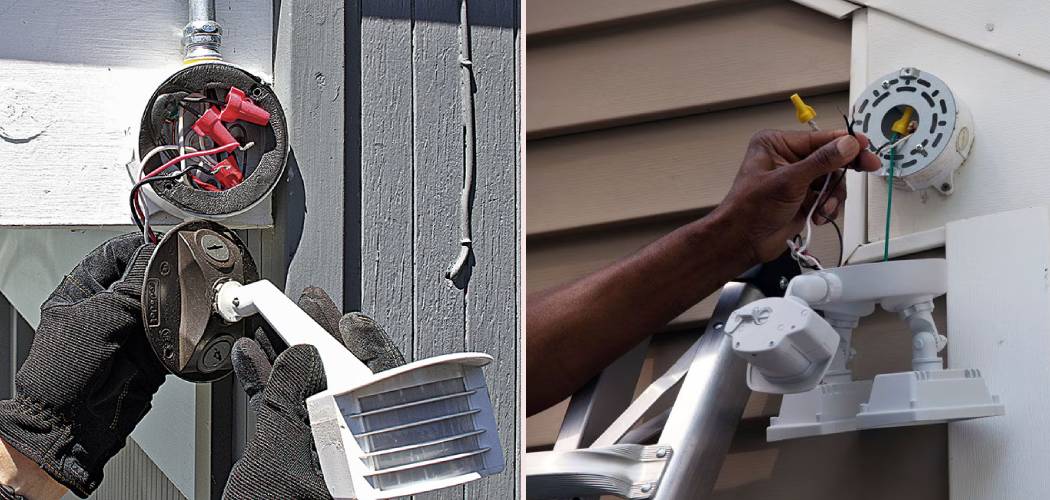
Step 3: Remove the Old Fixture
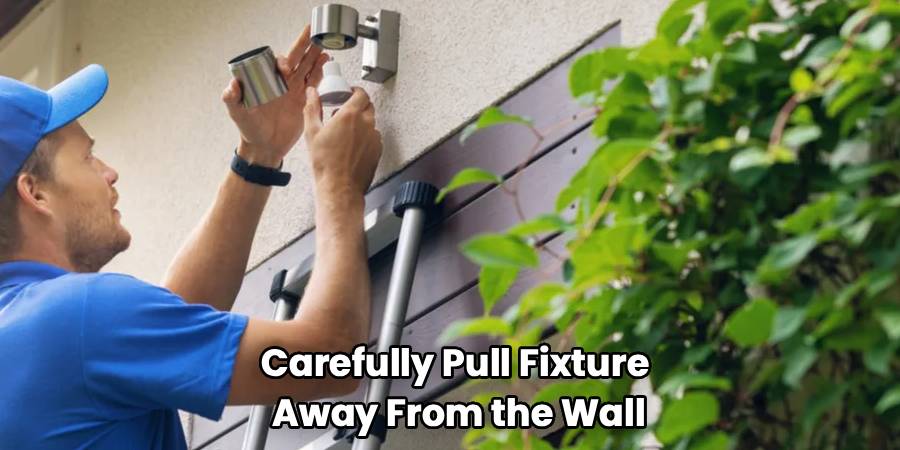
With the power confirmed off, you can start removing the old light. Usually, this involves unscrewing two long screws or a central nut that holds the fixture to the mounting bracket.
Carefully pull the fixture away from the wall. You will see three wires connecting the light to your house: a black (hot) wire, a white (neutral) wire, and a bare copper or green (ground) wire. Unscrew the wire nuts connecting these wires and separate the old fixture from the house wiring. If the wires look a bit corroded or frayed at the ends, use your wire strippers to trim them back and expose about half an inch of fresh, clean copper. This ensures a much better connection for your new light.
Step 4: Install the New Mounting Bracket
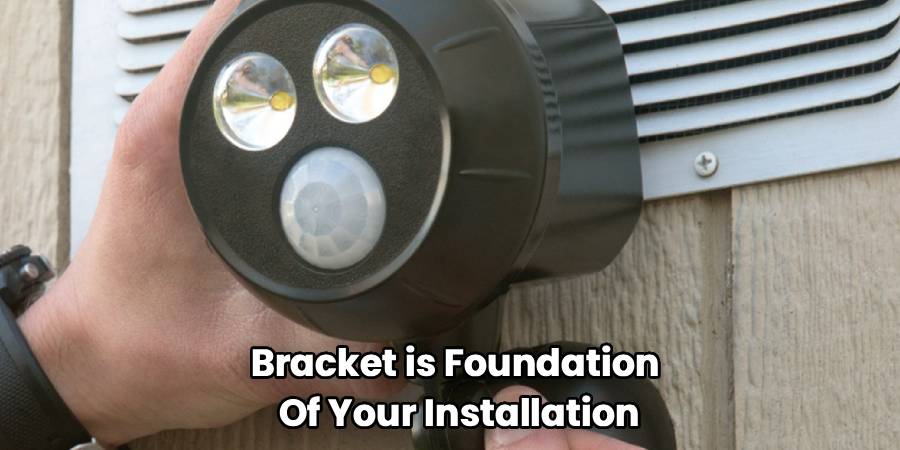
Most new motion sensor lights come with a specific mounting bracket or strap designed to fit standard junction boxes. The bracket from your old light might not line up perfectly with the new one, so it is best to replace it.
Screw the new mounting bracket into the junction box using the provided screws. Ensure it is level and secure. This bracket is the foundation of your installation; if it’s loose, your light will wobble in the wind, which can cause false alarms or wear on the wires over time. Pull the house wires through the center of the bracket so they are accessible and ready for the main event.
Step 5: How To Connect A Motion Sensor Light to the Power Source
Now comes the part that often intimidates people, but it is actually quite simple if you follow the color codes. You are essentially matching the wires from your house to the wires on the new fixture.
- Ground Wire: Start by connecting the ground wire. This is usually a bare copper wire or a green wire coming from your house. Connect it to the green screw on the mounting bracket or the green/copper wire on the light fixture. Secure them together with a wire nut. This is your safety net against electrical surges.
- Neutral Wire: Next, take the white wire from your wall and pair it with the white wire on the light fixture. Twist them together clockwise and cap them with a wire nut.
- Hot Wire: Finally, connect the black wire from the wall to the black wire on the fixture. This carries the current. Secure with a wire nut.
Sometimes, simply twisting the nut isn’t enough. When learning how to connect a motion sensor light, a pro tip is to give each wire a gentle tug after the nut is on. If a wire slides out, the connection is too loose and could cause arcing or failure later. Once secure, wrap a bit of electrical tape around the base of the wire nuts for extra security.
Step 6: Mount the Fixture and Seal
Carefully fold the wires back into the junction box behind the bracket. You don’t want to pinch them, so push them in gently. Position your new light fixture over the mounting bracket and secure it with the provided hardware (usually decorative nuts or screws).
Once the light is mounted firmly, you need to weatherproof it. Motion sensor light installation often fails prematurely because water seeps behind the fixture and corrodes the connections. Take your silicone caulk and run a bead around the top and sides of the fixture where it meets the wall. Leave the bottom unsealed. This is important—if water does manage to get in, leaving the bottom open allows it to drain out rather than pooling inside and shorting out your electronics.
Step 7: Test and Adjust
Head back to your breaker panel and flip the power back on. Your light might turn on immediately—don’t panic, this is normal. Most motion sensors have a “warm-up” period.
Walk in front of the sensor to see if it triggers. You will likely need to adjust two dials on the sensor unit:
- Sensitivity (Range): This determines how far out the sensor “sees.” If it’s too high, cars passing on the street might trigger it. Start low and increase until it catches you walking up the driveway but ignores the sidewalk.
- Time (Duration): This controls how long the light stays on after motion stops. Most people prefer settings between 1 to 5 minutes.
Frequently Asked Questions
Since motion sensor lights involve both electrical wiring and sensitive detection technology, questions often pop up during the process. Here are some of the most common inquiries we hear from homeowners.
Can I install a motion sensor light if I don’t have a ground wire?
If you live in an older home, you might open the electrical box and find only two wires (black and white) with no ground wire. While modern code requires grounding for safety, many double-insulated fixtures can technically operate without a ground wire. However, for a metal outdoor fixture, grounding is highly recommended to prevent shock hazards. If your box is metal and conduit-fed, the box itself might be grounded. You can attach the fixture’s ground wire to a grounding screw driven into the metal box. If you are unsure, this is the one instance where “motion sensor light troubleshooting” might involve calling a professional electrician to ensure your system is safe.
Why does my motion sensor light stay on all the time?
This is the most common frustration homeowners face. There are usually a few culprits. First, check if you accidentally triggered “manual override” mode. Many lights allow you to keep them permanently on by flipping the indoor light switch off and on quickly. To reset this, turn the switch off for at least 30 seconds, then turn it back on.
If that doesn’t work, your sensitivity might be too high. The sensor could be picking up subtle movements like tree branches swaying in the wind or heat rising from a dryer vent. Try lowering the sensitivity dial. Finally, check the sensor’s position. If it is pointed at a reflective surface (like a pool or a white wall), the reflection of the light itself might be tricking the sensor into staying active.
How high should I mount my motion sensor light?
Placement is everything. If you mount the light too high, the sensor might have blind spots underneath it. If it’s too low, the range will be severely limited, and it might be easily tampered with. The “Goldilocks” zone for most manufacturers is between 6 and 10 feet off the ground. This height allows the passive infrared (PIR) sensor to detect movement across a wide arc without creating dead zones directly in front of your door.
Can I use LED bulbs in my motion sensor light?
Yes, absolutely, and you should! However, you need to be careful. Old-school motion sensors were designed for incandescent bulbs, which draw more power. Some older sensors might cause LEDs to flicker or glow faintly when off because of the way the sensor draws power through the circuit (called “leakage current”).
Fortunately, most modern fixtures are built specifically for LEDs. If you are putting LED bulbs into a fixture, make sure the packaging on the bulbs says “dimmable” or “suitable for motion sensors.” Using non-compatible LEDs can lead to strobing lights or a shortened lifespan for both the bulb and the sensor.
What is the difference between hardwired and battery-operated sensors?
We focused on hardwired installation here because it is generally more reliable and powerful. Hardwired lights never run out of batteries and can support much brighter bulbs (floodlights). Battery-operated or solar-powered units are great for areas where you don’t have existing wiring, like a shed or a fence post. They are incredibly easy to install (no wires!), but they typically offer less brightness and require battery changes or direct sunlight to function reliably.
Conclusion
How to connect a motion sensor light is one of those skills that pays dividends immediately, giving you safety, convenience, and a lower electricity bill all at once. By taking the time to do it yourself, you not only save money on installation fees but also get to know your home’s electrical system a little better. Remember, the key to a successful project is patience—take your time adjusting the sensitivity and aiming the sensor so it works for you, not against you. Once you have it dialed in, you can rest easy knowing your home is watching out for you, lighting the way every time you step foot on the driveway.