

There is practically nothing in the world more frustrating than a smoke detector starting its low-battery chirp at 3:00 AM. It echoes through the hallway, confusing your pets and waking the kids, leaving you stumbling around in the dark trying to figure out which unit is the culprit. Whether you are dealing with that incessant beeping, planning to paint the ceiling, or simply replacing an expired unit (did you know they expire every 10 years?), taking these devices down can sometimes feel trickier than it should be.

You might think it’s just a matter of pulling, but modern safety devices often have locking mechanisms, hidden clips, and hardwiring that can make the process confusing. If you pull too hard, you risk damaging your drywall or stripping wires. In this guide, we are going to walk you through how to remove smoke alarm units safely and easily, regardless of whether they are battery-operated or hardwired into your home’s electrical system.
Step-by-Step Guide: How To Remove Smoke Alarm
Taking down a smoke detector is generally a straightforward task, but it requires a bit of patience and safety awareness. Before you grab the ladder, take a moment to assess what kind of alarm you have. Most homes have either standalone battery-powered units or hardwired interconnected systems. The steps below cover both scenarios to ensure you get the job done right.
Gather Your Tools and Safety Gear
Before you start climbing up toward the ceiling, make sure you have everything you need within arm’s reach. There is nothing worse than being perched on the top step of a ladder and realizing you forgot a screwdriver.
At a minimum, you will need a sturdy stepladder. Please avoid standing on dining chairs or swiveling office chairs; safety is paramount here. You might also need a flathead screwdriver (helpful for prying open battery doors or releasing locks), a Phillips head screwdriver (if you need to remove the mounting bracket), and a non-contact voltage tester if you are dealing with hardwired alarms. If you have high ceilings, make sure your ladder is tall enough so you aren’t overreaching, which can lead to falls.
Identify Your Alarm Type
Look at the face of the alarm. does it have a small light that is constantly green? That usually indicates it is receiving AC power, meaning it is hardwired. If you only see a blinking red light occasionally, it might be battery-only.
Knowing the difference is vital because hardwired alarms are connected to your home’s 120-volt system. While the shock risk is lower than working on an outlet, it is still live electricity. Hardwired units also have a battery backup, so don’t be confused if the light stays on even after you flip a breaker.

Turn Off the Power (For Hardwired Units)
If you have determined that your system is hardwired, or if you simply aren’t sure, the safest route is to turn off the power. Go to your home’s main breaker panel. Look for a breaker labeled “Smoke Alarms,” “Bedrooms,” or “Lighting.”
Flip the breaker to the “OFF” position. If you have a non-contact voltage tester, hold it near the alarm to confirm the power is cut. This step ensures you aren’t working with live wires when you disconnect the harness later. Safety should always be your first priority when dealing with removing smoke detectors.
Check for a Tamper-Resist Lock
This is the step that trips up most homeowners. Many modern smoke detectors come with a tamper-resist feature designed to prevent children or tenants from casually removing the batteries or the unit itself.
If you try to twist the alarm and it feels stuck, do not force it. You might rip the anchor out of the drywall. Look closely at the side of the base where the alarm meets the ceiling. You might see a small slot with a plastic pin inside. You often need to insert a small flathead screwdriver into this slot to disengage the locking pin while you twist. This is a common oversight when people are learning how to remove smoke alarm casings, leading to unnecessary frustration and broken plastic.
Twist and Detach the Unit
Once the locking pin is disengaged (or if your unit doesn’t have one), you are ready to remove the main body of the alarm. Grip the sides of the detector firmly but gently.
Most units detach with a counter-clockwise twist—think “lefty-loosey.” You usually only need to rotate it about half an inch to an inch. You should feel the unit release from the mounting bracket grooves. Once it releases, don’t yank it down immediately. If it is hardwired, it will still be tethered to the ceiling by a short bundle of wires. Lower it slowly to expose the connection.
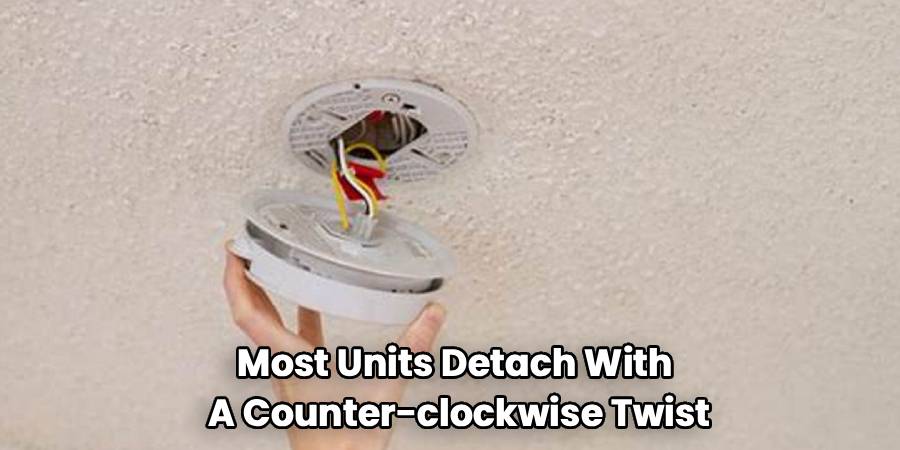
Disconnect the Wiring Harness
If you are holding a battery-only unit, it will come right off the ceiling, and you are done with the removal part. However, if you have a hardwired unit, you will see a plug (often called a wiring harness) connecting the alarm to the wires coming out of the ceiling box.
This plug usually has two or three wires (black, white, and sometimes red or yellow for interconnection). To disconnect it, look for plastic squeeze tabs on the sides of the plug connector. Squeeze these tabs firmly and pull the connector away from the alarm. It might be tight if it hasn’t been removed in years. Wiggle it gently while pulling to loosen it. Once disconnected, the alarm is free.
Expert Tips on How To Remove Smoke Alarm Safely
Sometimes, things don’t go according to plan. You might encounter a unit that has been painted over, sealing it to the ceiling. In this case, take a utility knife and very carefully score the paint around the perimeter of the alarm base. This breaks the paint seal and prevents you from peeling a giant chunk of paint off your ceiling when you twist the device.
Another expert tip involves the mounting bracket. If you are replacing the alarm with a new one from a different brand, you will almost certainly need to remove the old mounting ring. This is usually held in place by two screws. Loosen them (you usually don’t have to take them all the way out) and rotate the bracket to slip it off the screw heads. If the old wires are frayed or the wire nuts look loose, this is a good time to tidy them up before installing the new bracket.
Freqently Asked Questions
Dealing with home maintenance often brings up more questions than answers. Here are some of the most common concerns homeowners have when disconnecting smoke alarms.
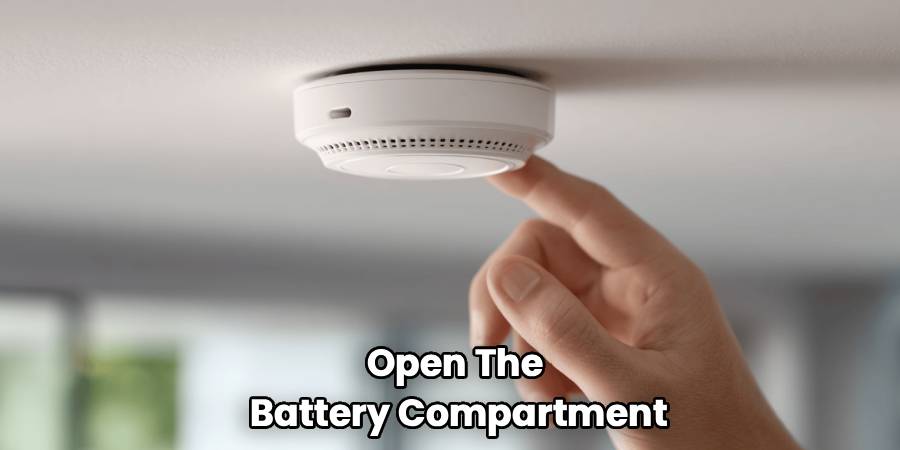
Why does my smoke alarm keep chirping after I remove it?
This is the most common question we get! If you have taken the unit down and disconnected it from the ceiling, but it is still chirping, the sound is coming from the backup battery inside the unit. Even hardwired alarms have batteries to keep them working during a power outage.
To stop the noise, you need to open the battery compartment and remove the old battery. On some sealed 10-year lithium units, there is no battery door. Instead, there is usually a deactivation switch or a slot on the back where you insert a screwdriver to permanently turn off the unit. Be careful—once you deactivate a sealed unit, it cannot be turned back on.
Can I get shocked removing a hardwired smoke alarm?
The risk is relatively low, but it is not zero. The voltage powering smoke alarms is typically 120 volts, the same as your wall outlets. While touching the plastic casing is safe, once you expose the wires, there is a potential for shock if the power is on.
This is why we strongly recommend turning off the circuit breaker before you start. If you handle the plastic wiring harness connector without touching the bare copper wires, you are generally safe, but flipping the breaker is the only way to be 100% sure.
Do I need to replace the mounting bracket?
If you are buying the exact same model and brand as the one you removed, you can usually keep the old mounting bracket and wiring harness. You just plug the new one in and twist it up.
However, if you are switching brands (like going from First Alert to Kidde) or even upgrading to a newer model from the same brand, the mounting brackets are rarely compatible. You will likely need to unscrew the old plate and install the new one that came in the box. Using a mismatched bracket can result in the alarm falling or not receiving power correctly.
How do I dispose of old smoke alarms?
You shouldn’t just toss old detectors in the kitchen trash. Ionization smoke detectors (the most common type) contain a tiny amount of radioactive material called Americium-241. While it is not harmful to you while it’s on your ceiling, it needs to be disposed of properly to protect the environment.
Check the back of the alarm. If it says “Photoelectric,” it contains no radioactive material and can often be recycled as e-waste. If it says “Ionization,” check your local municipal guidelines. Many manufacturers actially offer a take-back program where you can mail the old unit back to them for safe disposal.
What if the wires are different colors?
When you disconnect your hardwired smoke alarm removal, you will see wires coming from the ceiling. Usually, they are black (hot), white (neutral), and a third wire which is often red, yellow, or orange. This third wire is the “interconnect” wire that tells all the alarms in the house to go off if one detects smoke.
If you are installing a new alarm, match the colors from the new harness to the wires in the ceiling: black to black, white to white. If the interconnect wire colors differ (e.g., orange in the ceiling, yellow on the harness), consult the user manual for your new alarm. Never connect the interconnect wire to the black or white wires, as this can damage the unit.
Conclusion
Understanding how to remove smoke alarm devices properly is a small but essential DIY skill that saves you time, money, and frustration. By following the steps outlined above—checking for power, handling the locking pins gently, and safely disconnecting the wiring—you can handle that 3 AM chirping without damaging your ceiling or your sanity. Remember that these devices are your home’s first line of defense against fire, so whenever you take one down, make it a priority to replace it or change the battery immediately. Keeping your home safe is always worth the little bit of effort it takes to maintain these essential gadgets.