

We have all been there. It is usually 3:00 AM on a Tuesday. You are deep in a peaceful sleep when suddenly, a piercing, intermittent chirp echoes through the hallway. It stops long enough for you to drift back off, only to shriek again forty-five seconds later. It is the universal distress signal of a dying smoke detector battery.
While the noise is incredibly frustrating, especially in the middle of the night, it is actually a lifesaver. That annoying sound is your home’s way of telling you that its primary defense against fire is running on fumes. Ignoring it isn’t just bad for your sleep schedule; it’s a major safety risk. According to the National Fire Protection Association (NFPA), three out of every five home fire deaths result from fires in properties with no smoke alarms or smoke alarms that failed to operate—often due to dead batteries.
Replacing these batteries sounds like a simple task, and usually, it is. However, modern alarms have become slightly more complex. There are hardwired units, sealed lithium units, and standard battery-operated discs. If you are wondering how to change a battery in a fire alarm safely and correctly without triggering a false alarm or breaking the mounting bracket, this guide is for you. We are going to walk through everything you need to know to silence the chirp and secure your home.
Understanding Your Smoke Detector Before You Start
Before you grab a ladder, it helps to know exactly what is hanging on your ceiling. Not all smoke detectors are created equal, and treating them all the same can lead to frustration.
The Three Main Types:
- Standard Battery-Operated: These run solely on batteries (usually 9V or AA). They are easy to install and easy to maintain, but they rely 100% on you keeping fresh batteries in them.
- Hardwired with Battery Backup: These are connected to your home’s electrical system. You might think they don’t need batteries, but they do. The battery is a backup in case the power goes out. When these chirp, it usually means the backup battery is dead.
- Sealed Lithium Units (10-Year Alarms): These are becoming the new standard. The battery is sealed inside and cannot be replaced. If one of these starts chirping effectively implies the unit has reached the end of its life, and you must replace the entire alarm.
Safety First: Reaching the Alarm
Most smoke detectors are located on the ceiling or high up on a wall. This means you will likely need a boost.
- Use a Sturdy Stepladder: Never stand on a swivel chair or a wobbly stool. It isn’t worth a broken ankle.
- Protect Your Ears: If the alarm accidentally goes off while your face is next to it, it can be deafening. Consider wearing earplugs just in case.
- Dust Protection: The top of a smoke detector is a magnet for dust bunnies. Be prepared for a little debris to fall when you twist the unit.
Step-by-Step Guide: Restoring the Silence
Now, let’s get down to business. Follow this process to swap out that old power source and get your system running smoothly again.
Step 1: Gather Your Supplies
You don’t want to be standing at the top of a ladder shouting for someone to find you a battery. Have everything ready before you climb. You will need a new battery (check the label on your alarm for the specific type, usually a 9-volt or AA), a ladder, and a vacuum cleaner with a hose attachment (optional but recommended).
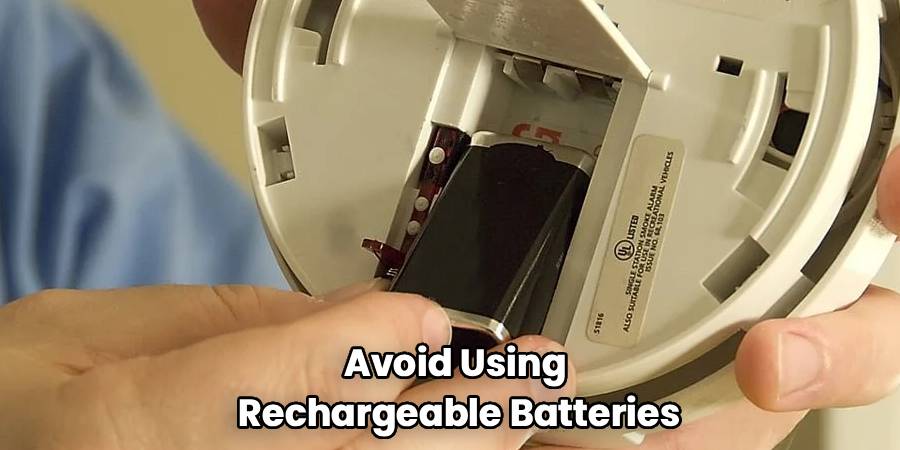
Pro Tip: Avoid using rechargeable batteries in smoke detectors. They lose their charge faster than alkaline or lithium batteries and the voltage drop-off can be sudden, meaning you get less warning time before the unit dies.
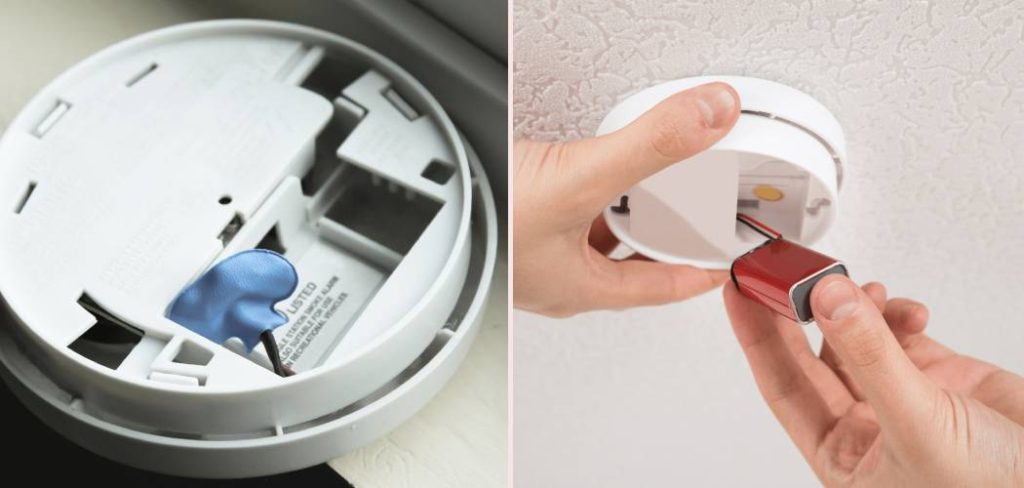
Step 2: Remove the Detector from the Mounting Bracket
In most cases, you cannot change the battery while the unit is still flush against the ceiling. You need to take it down.
- Grip the detector body firmly.
- Twist it counter-clockwise (to the left). You should feel it unlock from the plastic base.
- If it is a hardwired unit, you will see wires connecting it to the ceiling. Do not pull these! The unit should hang loosely by the wires, or you can unplug the wire harness by squeezing the plastic clip.

Step 3: Locate and Open the Battery Compartment
Once the unit is in your hand, look for the battery door. On some older models, the battery sits openly in a recess on the back. On newer models, there might be a slide-out drawer on the side of the unit.
- Slide Drawers: These usually have a small latch you press to slide the drawer out.
- Back Panel: You might need to unclip a small plastic cover.
- Hardwired Units: The compartment is often on the side or back, but sometimes you have to unhinge the unit from the ceiling plate to see it.
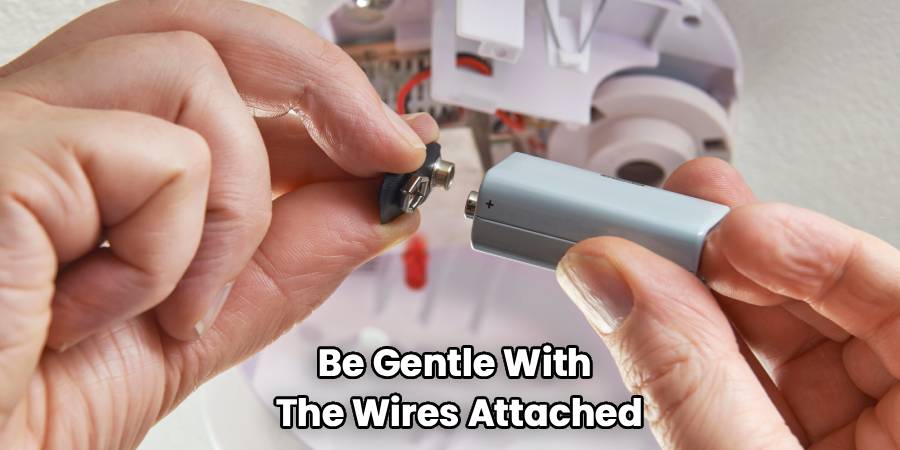
Step 4: Remove the Old Power Source
Take out the old battery. If it is a 9-volt, you might need to detach the connector cap. Be gentle with the wires attached to the connector cap; they can be fragile. If the battery is stuck, use a fingernail or a small flathead screwdriver to gently pry it up, but be careful not to damage the plastic housing.
Step 5: Insert the New Battery
This is the moment of truth. When figuring out how to change a battery in a fire alarm, the most common mistake people make is inserting the battery backward. Look closely at the markings in the battery compartment. Match the “Positive (+)” and “Negative (-)” signs on the battery to the compartment.
- For 9V batteries: The larger, hexagonal terminal is negative, and the smaller, circular terminal is positive.
- For AA batteries: Ensure the flat end goes against the spring.
Step 6: The Vital “Reset” Step (Don’t Skip This!)
Many people change the battery and immediately put the alarm back up, only to hear it chirp again 10 minutes later. This happens because the unit may hold a “residual charge” that remembers the low-battery error.
To fix this:
- Remove the battery.
- Hold down the “Test” button on the front of the unit for 15 to 30 seconds. This drains any remaining electricity from the capacitors.
- Re-insert the new battery. The unit might give a brief chirp to confirm it has power.
Step 7: Vacuum the Unit
While the alarm is down, look at the vents around the side. If they are clogged with gray fuzz or dust, the sensor can’t “smell” smoke accurately. This can also cause false alarms. Use your vacuum hose or a can of compressed air to clean out the vents.
Step 8: Reinstall and Test
Line up the mounting guides on the back of the alarm with the bracket on the ceiling. Twist it clockwise (to the right) until it clicks into place. If you disconnected a wire harness, make sure to snap it back in before mounting.
Once it is up, press and hold the test button until the loud alarm sounds. This confirms the battery is connected and the sensor is active.
Why Is My Alarm Still Beeping?
You followed the instructions, bought fresh batteries, and it is still making noise. Nothing is more frustrating. Here are the likely culprits:
1. The “Hush” Mode
Some alarms have a hush feature that chirps to let you know the sensitivity has been temporarily reduced (like when you burn toast). This should stop after a few minutes.
2. The Battery Drawer is Open
Some units have a safety feature where the battery drawer must be clicked shut completely. If it is slightly ajar, the terminals won’t make contact.
3. The Unit is Expired
This is the most common reason for persistent chirping after a battery change. Smoke detectors do not last forever. The sensors inside them degrade over time. The industry standard lifespan is 10 years. If you look at the back of your alarm, there should be a “Manufacture Date.” If that date was more than 10 years ago, no amount of new batteries will stop the noise. You need to buy a new unit.
4. Environmental Factors
Is the alarm near a bathroom? Steam from a hot shower can trigger false alarms or cause moisture buildup on the battery contacts. Is it near a vent? A draft can blow dust into the sensor, causing it to error out.
Why Regular Maintenance Matters
It is easy to view smoke alarms as background decor that we only notice when they are annoying us. However, they are sophisticated pieces of technology designed to detect microscopic particles in the air.
A dead battery renders the most expensive, high-tech alarm useless. The National Fire Protection Association reports that dead batteries caused 25% of smoke alarm failures. By staying on top of this simple maintenance task, you aren’t just stopping a noise; you are ensuring your family has the critical seconds needed to escape a fire.
Many experts recommend writing the date on the battery with a permanent marker before you install it. This way, the next time you take it down, you know exactly how old it is. If you take an alarm down and see a battery from five years ago, you know you have been living at risk.
Frequently Asked Questions
Here are some of the most common questions homeowners ask about maintaining their fire safety systems.
How often should I replace my fire alarm batteries?
The general rule of thumb is every six months. A great way to remember this is to change your batteries when you change your clocks for Daylight Saving Time. However, if you are using high-quality lithium batteries, they may last a year or more. Regardless of the schedule, if the alarm starts chirping, change the battery immediately. Never wait.
Is the process for how to change a battery in a fire alarm different for hardwired units?
Yes, slightly. With hardwired units, you are dealing with AC power from your home. While the voltage stepping down to the alarm is usually low, it is intimidating to see wires. The physical process of changing the battery is the same (open door, swap battery), but you have to be careful not to loosen the wire nuts connecting the alarm to the house power. Also, hardwired alarms often have a different “chirp” pattern to indicate a loose wire versus a dead battery, so listen closely.
Can I use rechargeable batteries in my smoke detector?
No, you should generally avoid them. Rechargeable batteries (NiMH) have a different voltage discharge curve than alkaline or lithium batteries. They lose power relatively quickly, meaning you will be changing them much more often. More importantly, when they die, they die abruptly. An alkaline battery dies slowly, giving the alarm plenty of time to chirp a “low battery” warning. A rechargeable battery might die so fast the alarm doesn’t have enough juice to chirp, leaving you unprotected without warning.
What is the difference between Ionization and Photoelectric alarms?
While this doesn’t change how you replace the battery, it changes how the alarm detects fire.
- Ionization alarms are better at detecting flaming fires (like a grease fire).
- Photoelectric alarms are better at detecting smoldering fires (like a cigarette on a couch).
Most experts recommend having “dual sensor” alarms that use both technologies, or having a mix of both types in your home.
How do I dispose of the old batteries?
Please do not throw 9V batteries in the regular trash. If the positive and negative terminals touch a piece of metal (like aluminum foil or a paper clip) in your trash can, they can spark and actually start a fire. It is ironic and dangerous. Place a piece of electrical tape or masking tape over the terminals before recycling them at a local electronics drop-off center or battery recycling bin.
Conclusion
Now that you have mastered how to change a battery in a fire alarm, you can rest easy knowing your home is protected. It is a small task that takes less than ten minutes, but it provides peace of mind that is invaluable.
Remember to test your alarms monthly by pressing the test button, and keep an eye on those expiration dates on the back of the units. Fire safety is about preparation, and a fresh battery is the simplest, most effective preparation you can do. So, grab that ladder, silence that chirp, and sleep soundly tonight.