

Upgrading your home security is one of the smartest moves you can make for your peace of mind. You have likely purchased a new smart doorbell and are now staring at the box, wondering if you need to call a professional electrician. The good news is that you absolutely do not need to hire a pro. This guide will walk you through exactly how to install Ring Video Doorbell devices yourself, saving you money and giving you a sense of accomplishment.
Most homeowners can complete this project in under thirty minutes. It does not matter if you are handy with tools or if this is your first time using a drill. We will break everything down into simple, manageable chunks. You will soon be able to answer the door from anywhere in the world right from your smartphone.
Before we start drilling holes or messing with wires, take a deep breath. The process is designed to be consumer-friendly. Whether you are working with a battery-powered model or a hardwired version, the steps are straightforward. Let’s get your new security system up and running.
Preparation: Gathering Your Tools
Before you start the physical installation, you need to make sure you have everything ready. There is nothing worse than being halfway through a project and realizing you are missing a crucial tool.
Most Ring kits come with the basics, but having your own reliable tools makes the job easier.
Essential Hardware Checklist
You likely have most of these items in your junk drawer or garage. Grab a Phillips-head screwdriver, as this is the primary tool you will need. If you are installing into wood or vinyl siding, you might not even need a drill.
However, if you are mounting on brick, stucco, or concrete, a power drill is mandatory. You will need it to create pilot holes for the wall anchors. A standard hammer will help you gently tap those anchors into place.
Connectivity Check
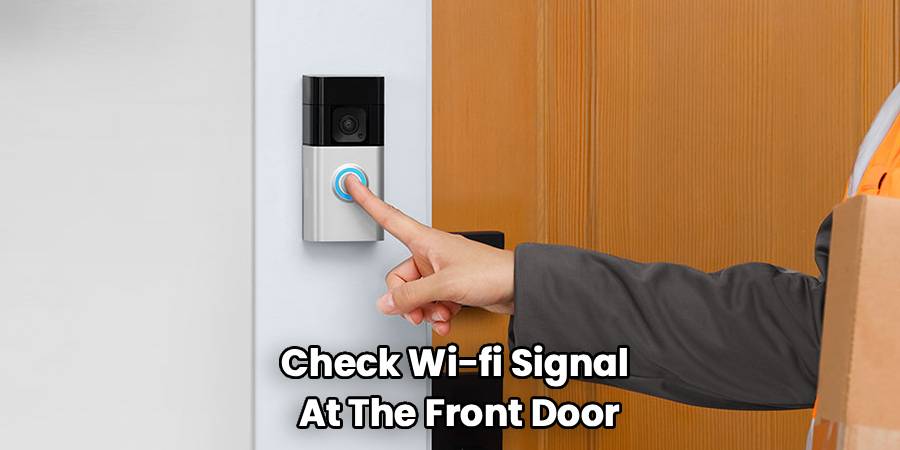
Do not skip this vital step. Before you drill a single hole, check your Wi-Fi signal at the front door. Stand exactly where you plan to mount the device. Close the door behind you to simulate the real-world interference.
Open a video on your phone or run a speed test. If the video buffers or the signal is weak, your new doorbell will struggle. You might need a Wi-Fi extender to bridge the gap between your router and the front porch.

Phase 1: Powering Up The Device
Charging the Battery Pack
If you have a battery-powered model, this is your first task. Even if you plan to hardwire the device for a trickle charge, the battery needs to start at 100%.
Locate the orange USB cable included in the box. Plug it into the battery pack and connect it to a power source. You will see red and green lights indicating the status.
Wait until the light turns solid green. This usually takes between four to six hours. Do not rush this part, as starting with a full charge prevents setup glitches later.
App Configuration
While the battery charges, download the Ring app. Create your account if you haven’t already.
Select “Set Up a Device” and follow the on-screen prompts. You will scan the QR code found on the device or the packaging. Doing this digital handshake before mounting the device is crucial.
It ensures your phone and the doorbell are talking to each other before you bolt it to the wall. It saves you the headache of unscrewing everything if there is a connection issue.
Phase 2: preparing the Installation Site
Removing the Old Doorbell
If you are replacing an existing traditional doorbell, you need to remove it first. Go to your breaker box and shut off the power to the front door area. Safety is always the priority when touching wires.
Unscrew the faceplate of the old button. You will see two wires connected to the back.
Loosen the screws holding these wires and detach them. Be careful not to let the wires slip back into the hole in the wall. Wrap them around a pencil or tape them to the wall temporarily.
Ideally Positioning the Device
Height matters for video quality. You want the camera to capture faces, not just torsos or the sky. The manufacturer recommends mounting the device about 48 inches (four feet) from the ground.
This height is optimized for the motion sensors. It helps the device distinguish between a passing car and a person walking up your path.
Hold the mounting bracket against the wall at this height. Use the small level tool included in your kit to ensure it is perfectly straight.
Mark Your Drill Holes
With the bracket leveled, use a pencil to mark the four corner holes. If you are mounting on an uneven surface like lap siding, you might need to use a wedge kit.
This angled mount helps the camera sit flat despite the slanted siding. If you are in a corner, use a corner kit to angle the camera toward the entryway.
Mark these accessory holes now if you plan to use them.
Phase 3: The Physical Installation
Drilling into Brick or Stucco
If your home has a masonry exterior, this is where you use the drill. Attach the masonry bit included in the box (or use your own).
Drill holes about one inch deep at your marked spots. Ideally, you want a snug fit for the plastic anchors.
Take the plastic wall anchors and press them into the holes. If they are tight, use your hammer to tap them flush with the wall surface.

Securing the Mounting Bracket
If you have wood siding, you can skip the anchors. You can screw the bracket directly into the wood.
Place the bracket over your pilot holes (or anchors). Drive the mounting screws in until the bracket is firm against the wall.
Do not overtighten these screws. If you warp the plastic bracket, the doorbell unit won’t snap in correctly later.
Connecting the Wires (Optional)
If you have existing doorbell wiring, now is the time to connect it. This step allows your new smart device to ring your old indoor chime. It also provides a trickle charge to the battery.
Loosen the two terminal screws on the back of the doorbell or the mounting bracket (depending on your model). Wrap one wire around each screw.
It does not matter which wire goes to which screw. The current is alternating, so polarity is not an issue here. Tighten the screws so the wires are secure.
Feed any excess wire gently back into the wall hole. You want a flush surface for the device to sit against.
Phase 4: Mounting and Securing
Attaching the Faceplate
The hard work is done. Now you just need to place the doorbell unit onto the bracket.
Line up the tabs on the back with the slots on the bracket. Push it in and then slide it down (or click it in, depending on the model). You should feel a satisfying click or snap.
Give it a gentle tug to ensure it is seated correctly. It should feel solid and unmoving.
The Security Screw
This is a critical step for theft prevention. Locate the tiny star-shaped screw in your hardware bag.
This is a specific security screw designed to prevent strangers from popping your battery out. Insert it into the bottom of the faceplate.
Use the special screwdriver provided in the kit. Tighten it until it is flush. Do not use a standard screwdriver, as it won’t fit the head pattern.
Understanding how to install Ring Video Doorbell hardware correctly includes this final security measure to protect your investment.
Phase 5: Restoring Power and Testing
Flipping the Breaker
Head back to your circuit breaker panel. Flip the switch back on to restore power to the doorway.
If you hardwired the device, the LED ring on the front should light up immediately. It might spin white, indicating it is booting up or updating firmware.
Let it do its thing for a few minutes. Do not interrupt a firmware update.
The Button Test
Once the light is solid or pulsing slowly, press the button. You should hear a sound from the device itself.
If you wired it to your home’s chime, you should hear that ring inside as well. Your phone should also receive a notification instantly.
Open the notification to test the two-way audio. Stand outside and talk to someone inside the house (or just talk to yourself to test the echo).
Troubleshooting Common Installation Issues
Even with a perfect install, things can sometimes act up. Here are the most common hiccups users face during setup.
The “No Power” Issue
If your hardwired device isn’t lighting up, check the wire connection. The wires might be corroded if your house is older.
Clean the exposed copper with a bit of sandpaper or wire strippers. Ensure the terminal screws are tight.
Also, check your transformer voltage. Some very old doorbells use low-voltage transformers that don’t provide enough juice for video. You might need a transformer upgrade if it is under 16 volts.
Poor Video Quality
If the video is grainy or freezes, Wi-Fi is the usual suspect. Brick and stucco walls are notorious for blocking wireless signals.
Check your router placement. Moving it a few feet closer to the window can make a huge difference.
Consider a mesh network system if your router is buried in a basement or back office.
False Motion Alerts
If your phone is buzzing every time a car drives by, your angle is likely too high. You can adjust this in the app, but physical adjustments help too.
Use a wedge kit to angle the camera down slightly. This focuses the sensor on your porch rather than the street.
Adjust the sensitivity slider in the app settings to “People Only” mode if available.
Optimizing Your Settings
Now that the hardware is on the wall, the software needs tuning. The default settings are rarely perfect for every home.
Setting Motion Zones
Go into the app and select “Motion Settings.” You can draw custom shapes over the camera view.
Exclude busy streets or your neighbor’s driveway. This saves battery life and your sanity.
Focus the zones on the walkway leading up to your door. This ensures you only get alerted when it matters.
HDR and Night Vision
If your porch is dark, enable the color night vision setting. It provides better detail than standard black and white IR video.
If your entryway is backlit by the sun, turn on HDR (High Dynamic Range). This balances the exposure so faces aren’t just dark silhouettes.
Snapshot Capture
This feature takes still images every few minutes between motion events. It gives you a complete timeline of what happened outside your house.
Be aware that this drains the battery faster. If you don’t have hardwiring, you might want to leave this off or set it to a lower frequency.
Maintenance and Care
Your new doorbell is weather-resistant, but it isn’t invincible. A little maintenance keeps it running for years.
Battery Management
If you are running on battery power alone, keep an eye on the percentage in the app. Cold weather drains lithium-ion batteries significantly faster.
When it hits 20%, bring it inside for a charge. Having a spare battery pack is a pro move so you never have downtime.
Cleaning the Lens
Pollen, dust, and rain spots can obscure your view. Wipe the lens with a microfiber cloth once a month.
Do not use harsh chemicals or paper towels, as they can scratch the glass coating. A simple wipe is usually enough to keep the picture crisp.
Checking tightness
Seasons change, and materials expand and contract. Once a year, check the mounting screws.
Ensure the bracket is still tight against the wall. Loose screws can cause vibration in the audio or false motion triggers.
Frequently Asked Questions
Can I install this without a drill?
Yes, but it depends on your siding. If you have wood or vinyl siding, you can often screw the bracket directly in with some elbow grease.
Alternatively, there are “no-drill” mounts available separately. These use strong adhesive or clamp onto the door itself. They are great for renters who cannot put holes in the wall.
Do I need to turn off the power if I am using battery only?
No, you do not. If you are not touching any existing electrical wires, you can leave the breaker alone.
However, if you are removing an old wired doorbell to replace it with a battery one, you should still turn off the power while you cap off the old wires.
Why is my internal chime not ringing?
This is a common configuration setting. Go into the app and look for “Device Settings” and then “In-home Chime Settings.”
Make sure it is set to “Mechanical” or “Digital” depending on what you have. If it is set to “None,” it won’t trigger the indoor bell.
How long does the battery last?
This varies wildly based on usage. In a low-traffic area with moderate settings, it can last months.
In a busy neighborhood with high sensitivity, it might only last a few weeks. Hardwiring is the best solution to avoid manual charging.
What if my Wi-Fi doesn’t reach the door?
You have a few options. A standard Wi-Fi extender is the cheapest fix.
Ring also sells a “Chime Pro” which acts as both an indoor speaker and a Wi-Fi signal booster specifically for their cameras.
Can I mount it horizontally?
No, the device is designed to be mounted vertically. Mounting it sideways will mess up the motion sensors and the video orientation.
The sensors look outward and downward. If you rotate it, they will look at the side walls and miss visitors.
What voltage does my transformer need to be?
Most video doorbells require a transformer rated between 16 and 24 volts AC. Many older homes have 10-volt transformers.
You can find the rating stamped on the transformer itself, usually located in the garage, basement, or attic.
Is the security screw mandatory?
Technically no, the device will work without it. However, without it, anyone can walk up and remove the faceplate and battery in seconds.
Always install the security screw. It is a tiny step that adds a significant layer of theft protection.
Can I use my own screws?
You can, but ensure the heads are flat enough. If the screw head sticks out too much, the doorbell unit won’t snap onto the bracket flush.
The included screws are sized perfectly for the bracket countersink. Stick to the included hardware whenever possible.
Conclusion
Now that you know how to install Ring Video Doorbell devices, you can enjoy the enhanced security and convenience they provide. You have successfully navigated the wiring, the drilling, and the digital setup. It is a satisfying weekend project that offers immediate benefits. You will never have to wonder who is knocking at your door again. Keep your app updated and your lens clean, and your new system will serve you well for years to come. Welcome to the neighborhood of smart home security.