
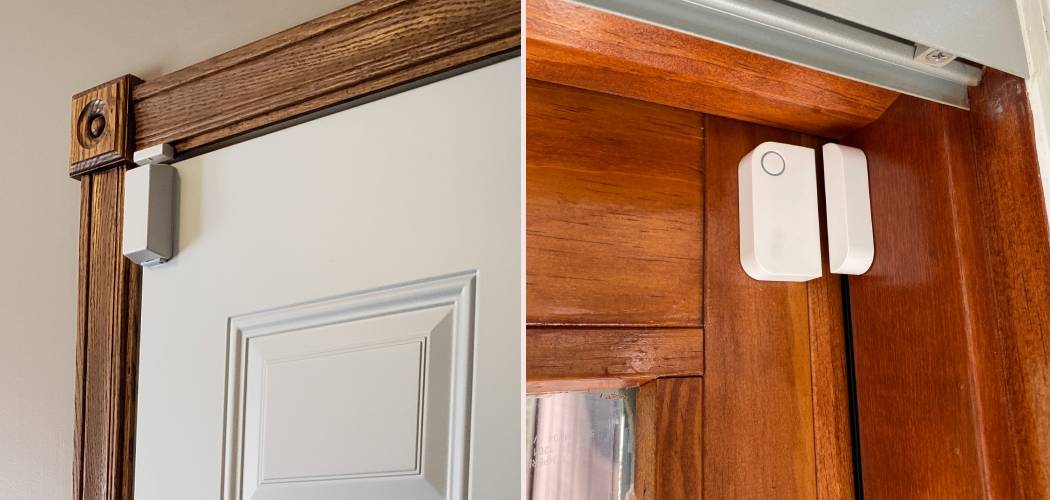
There is something undeniably sleek about a security system that works without being seen. While surface-mounted sensors are easier to stick on, they can be bulky, unsightly, and prone to getting knocked off by rambunctious kids or pets. That is why so many homeowners and DIY enthusiasts prefer the clean look of recessed sensors. These “invisible” contacts hide inside the door and the frame, maintaining the aesthetic of your home while keeping it secure.
If you are looking to upgrade your security but are worried about drilling holes in your beautiful woodwork, don’t panic. Learning how to install recessed door alarm sensor hardware is easier than it looks, provided you have the right tools and a bit of patience. Whether you are retrofitting an older hardwired system or setting up modern wireless gear, the principles remain largely the same. In this guide, we will walk you through everything you need to know to get that professional, hidden finish without calling in an expensive technician.

Why Choose Recessed Over Surface-Mount?
Before we grab the drill, let’s talk about why this effort is worth it. Surface-mounted sensors are the “peel and stick” solution of the security world. They work, but they sit right on top of the door casing. Recessed sensors, often called “plunger” or “bullet” contacts, are buried inside the wood.
The benefits go beyond just looks. Because they are hidden, they are much harder for an intruder to tamper with. A burglar can’t smash a sensor they can’t see. Furthermore, because the magnet and the sensor are almost touching inside the wood, the connection is often more reliable and less prone to false alarms caused by slight door movements. It is a cleaner, safer, and more professional approach to perimeter protection.
Tools You Will Need
Preparation is half the battle here. Since we are dealing with drilling into permanent fixtures like door jambs, you want to measure twice and drill once.
Here is your checklist:
- Power Drill: A cordless drill is easiest to maneuver.
- Spade Bits or Forstner Bits: Most standard recessed sensors require a 3/4-inch or 3/8-inch hole. Check your specific sensor manual for the exact size.
- Tape Measure and Pencil: For precise marking.
- Masking Tape: Helps prevent wood splintering.
- Silicone or Adhesive: Sometimes the friction fit isn’t enough.
- Wire Strippers/Cutters: Essential if you are installing wired sensors.
- Fish Tape or Coat Hanger: For fishing wires through the wall (if wired).
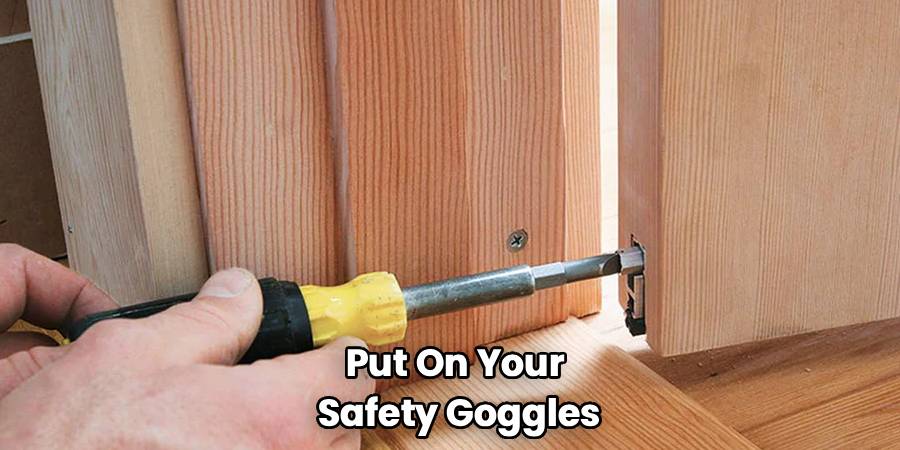
- Safety Goggles: Wood shavings will fly.

Step-by-Step Guide on How To Install Recessed Door Alarm Sensor
This process requires precision. If your holes don’t line up, the magnet won’t trigger the sensor, and your alarm won’t work. Take your time with the alignment steps. Here is the breakdown of the installation process.
Step 1: Determine the Best Location
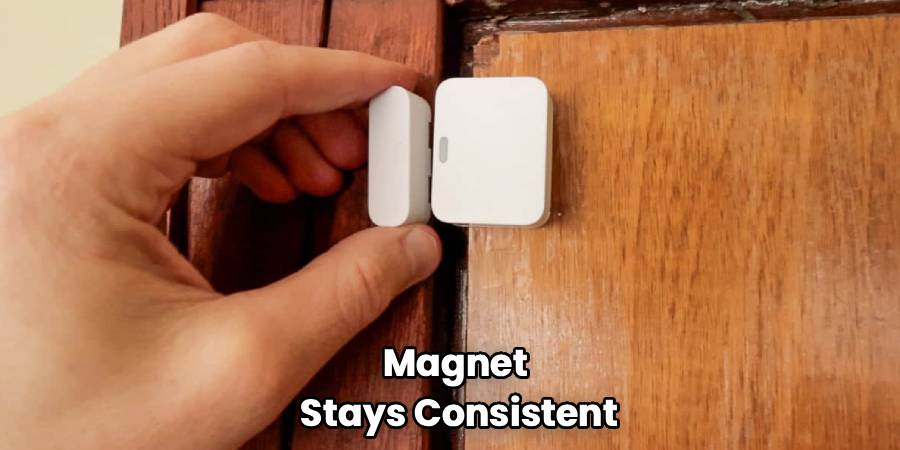
Start by choosing where the sensor will live. The ideal spot is usually on the top edge of the door, about 3 to 6 inches away from the hinge side. Why near the hinge? Because the door moves less on the hinge side, meaning the gap between the sensor and magnet stays consistent. However, many people prefer the handle side (the strike side) because it offers the most immediate detection if the door opens even slightly.
If you are installing on the handle side, place it near the top corner. Avoid the very center of the top header, as that area often has structural framing or gaps that can make mounting difficult. Once you pick a spot, use your pencil to mark the center point on the door frame (jamb).
Step 2: Mark the Matching Spot on the Door
This is the most critical step. If the hole in the door doesn’t align perfectly with the hole in the frame, the circuit won’t close.
An easy trick to get this right is to use a small dab of toothpaste, lipstick, or a wet marker. Place a dot on the center mark you just made on the frame. Close the door firmly so the wet mark transfers onto the top of the door. Open the door, and you should have a perfect matching mark. Double-check this with a tape measure to ensure the distance from the edge is identical on both the door and the frame.
Step 3: Select the Right Drill Bit
Check your sensor’s packaging. It will specify the drill bit size—typically 3/4 inch (about 19mm) or 3/8 inch (about 9.5mm).
Using a bit that is too large will cause the sensor to fall out, requiring you to glue it in messily. Using a bit that is too small poses a risk of cracking the sensor housing when you try to force it in. If you are drilling into a nice wood door, consider using a Forstner bit rather than a spade bit; it cuts a much cleaner hole with less splintering.
Step 4: Drill the Frame and Door
Put on your safety goggles. Start with the door frame. You need to drill deep enough to accommodate the sensor body and, if wired, the wire slack. Wrap a piece of masking tape around your drill bit to mark the target depth so you don’t drill too deep or too shallow.
Drill straight up into the frame. Keep the drill steady and vertical. Once the frame is done, move to the door. Drill into the top of the door at your marked spot. This hole usually needs to be shallower, just deep enough for the magnet.
Pro-Tip: When figuring out how to install recessed door alarm sensor components, alignment is the trickiest part, so always drill slowly to prevent the bit from “walking” off your center mark.
Step 5: Run the Wires (For Wired Systems)
If you are using wireless sensors, skip to Step 6.
For wired systems, you now need to fish the wire from your alarm panel or keypad to the hole you just drilled in the door frame. This is often the hardest part of the job. You may need to drill a small access hole through the header or attic space above the door. Use a fish tape or a straightened coat hanger to pull the 22-gauge security wire through the hole in the jamb. Connect the wires to the screw terminals on the sensor or splice them using B-connectors (beanies) if the sensor has flying leads.
Step 6: Insert the Sensor and Magnet
Push the sensor assembly into the hole in the door frame. It should be a snug fit (a “friction fit”). If it is too loose, use a small amount of silicone adhesive to secure it, but be careful not to glue the sensor mechanism shut if it’s a mechanical plunger type.
Next, press the magnet into the hole in the door. Since the magnet is usually just a solid cylinder or disc, you can gently tap it flush with a rubber mallet if necessary. Never use a metal hammer directly on the magnet, as you might crack it.
Step 7: Test the System
Before you clean up the sawdust, test the sensor. Close the door and check your alarm keypad or app. It should show the zone as “Closed” or “Ready.” Open the door, and it should immediately fault or chime. If it doesn’t work, the magnet might be too deep in the door, or the alignment might be slightly off. You may need to add spacers behind the magnet to bring it closer to the sensor.
Common Installation Challenges
Even the handiest DIYers run into snags. Here are a few hiccups you might encounter and how to fix them.
The “Walking” Drill Bit
If your drill bit slides across the wood before it starts cutting, you will ruin the finish. Use a center punch or a nail to make a small divot in the wood before you start drilling. This gives the bit a place to grab.
Steel Doors
Metal doors interfere with magnetic fields. If you install a standard recessed magnet into a steel door, the steel might absorb the magnetic field, preventing the sensor from triggering. You need to purchase specialized wide-gap magnets or “armored” sensors designed specifically for steel doors. Alternatively, you can buy rubber or plastic grommets that insulate the magnet from the metal door skin.
Loose Sensors
If you accidentally drilled the hole slightly too big, the sensor might fall out over time due to gravity or door vibrations. A few wraps of electrical tape around the sensor body can increase its diameter for a snugger fit. Alternatively, a dab of clear silicone caulk works wonders.
Frequently Asked Questions
Can I install recessed sensors on windows?
Yes, absolutely. The process is very similar. For double-hung windows, you typically drill into the bottom of the lower sash and the sill, or into the top of the lower sash and the bottom of the upper sash. Just be extremely careful about drilling into windows, as hitting the glass is a real risk. Ensure you have enough depth in the sash frame before drilling.
What if my door is hollow?
Hollow core doors are very common indoors. You can still install recessed sensors, but the magnet won’t have solid wood to grip onto inside the hole. In this case, you definitely need to use adhesive (like Liquid Nails or silicone) to bond the magnet to the thin veneer of the door skin.
Is It Difficult to Learn How To Install Recessed Door Alarm Sensor Kits?
It is not difficult, but it requires confidence with power tools. If you are comfortable using a drill and reading a tape measure, you can do this. The electrical side of things (for wired sensors) is low voltage and safe, so you don’t need to worry about shocks. The biggest risk is cosmetic damage to the door if you drill incorrectly.
How long do the batteries last in wireless recessed sensors?
Since recessed sensors are hidden, changing batteries can be a bit of a pain compared to surface-mounted ones. You have to pry the sensor out of the hole to access the battery compartment. However, most modern wireless recessed sensors use lithium batteries that last 3 to 5 years. It is a maintenance task you won’t have to do very often.
Can I paint over the sensors?
Generally, yes. If you have white sensors and a dark wood door, you might want to camouflage them. You can lightly paint over the exposed face of the sensor and magnet. Just avoid using thick coats of paint that might block the signal (for wireless units) or seal the sensor shut. Avoid metallic paints, as they can interfere with the magnetic operation.
Conclusion
Now that you have learned how to install recessed door alarm sensor devices, you can secure your home without sacrificing its style. By taking the time to hide your security hardware, you not only make your system more tamper-resistant but also maintain the clean, polished look of your entryways. It is a small detail that makes a big difference in the overall finish of your home. So, grab that drill, check your alignment, and enjoy the peace of mind that comes with a job well done.