

Nothing disrupts a peaceful evening quite like a chirping safety device that just won’t quit. Whether it’s a false alarm caused by burnt toast or that relentless low-battery chirp at 2 AM, knowing how to handle your unit quickly is essential for your sanity. If you are struggling to figure out how to reset a Kidde smoke alarm, you aren’t alone—it’s one of the most common household maintenance questions we see.
This guide will walk you through the process step-by-step, covering different models and scenarios so you can get back to silence and safety. We’ll also cover why these devices act up and how to prevent future interruptions.
Understanding Why You Need a Reset
Before we dive into the buttons and batteries, it helps to understand why your device is making noise in the first place. These units are sensitive by design. They have to be. But sometimes, that sensitivity leads to nuisance alarms. Common triggers include cooking smoke, steam from showers, or even dust buildup inside the sensor chamber.
Sometimes, the unit just needs a fresh start after a battery change. A reset essentially clears the processor’s memory. It stops the current alert cycle and tells the unit to start monitoring fresh.
Think of it like rebooting a computer when it freezes. If you don’t perform the reset correctly, the unit might “remember” the low battery state even after you’ve put in a fresh 9-volt. That results in the dreaded continuous chirping.
Identifying Your Kidde Model
Not all units are built the same. Kidde manufactures several types of detectors, and the reset process varies slightly between them.
Battery-Operated Only: These are standard units that run purely on AA or 9-volt batteries. They are the easiest to manage.
Hardwired with Battery Backup: These are connected to your home’s electrical system but have a battery in case the power goes out.
Sealed 10-Year Battery: These have a non-replaceable lithium battery. They are designed to last a decade without battery changes.
Wireless Interconnected: When one goes off, they all go off. Resetting one usually quiets the whole network, but you need to find the initiating unit first.
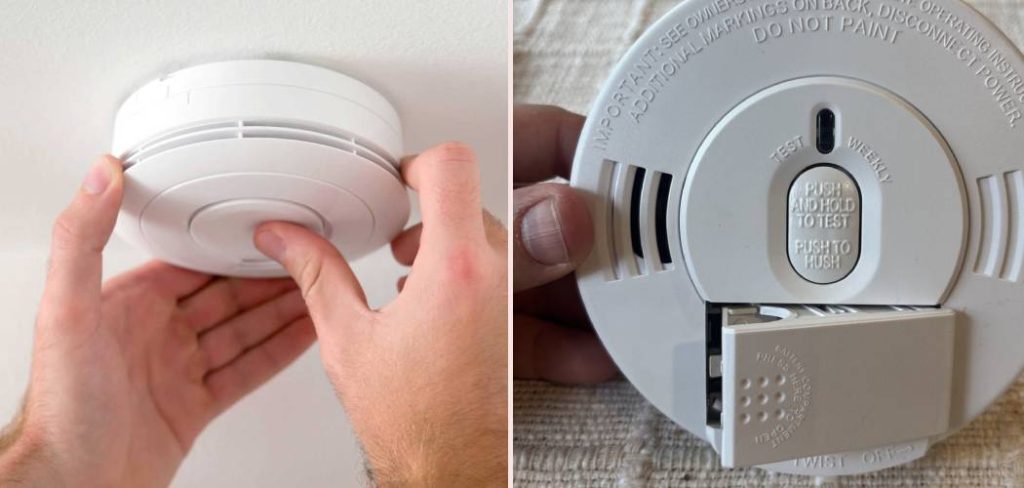
Take a quick look at the back of your device. You should see a model number and a description of the power source.
If you see a plug or wires, it’s hardwired. If you see a battery door, it’s replaceable. If there’s no door and no wires, it’s likely a sealed unit.

Step-by-Step Guide: How To Reset A Kidde Smoke Alarm
Hardwired units are the most common in modern homes. Because they have two power sources (AC power and battery), they can be a bit trickier to silence.
Turn Off the Power at the Breaker
Safety is always the priority. Go to your home’s circuit breaker box. Flip the switch that controls the room where the alarm is located. This cuts the AC power to the unit, ensuring you aren’t working with live electricity while handling the device.
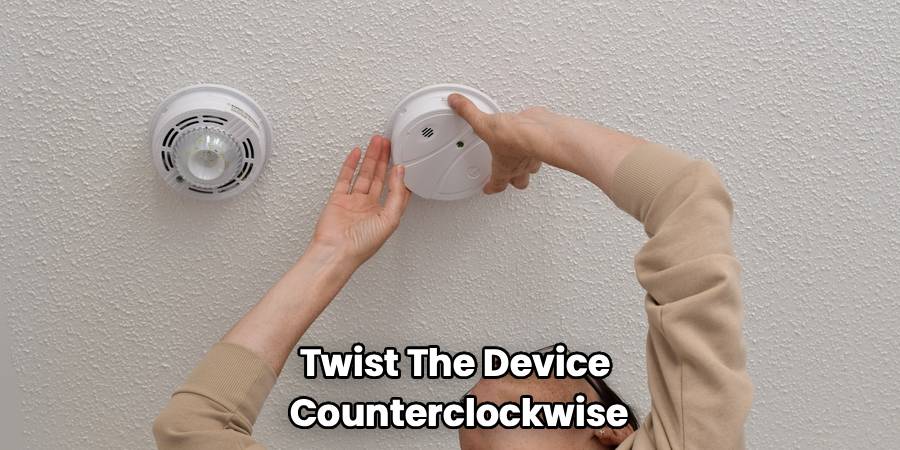
Remove the Unit from the Mounting Bracket
Reach up and twist the device counterclockwise. It should release from the ceiling bracket. You will see wires connected to the back.
Disconnect the Power Harness
On the back of the unit, you will see a plug with wires (usually black, white, and red/yellow). Squeeze the plastic tabs on the sides of the plug. Pull gently to disconnect the harness from the unit. Now the device is completely disconnected from your home’s power.
Remove the Backup Battery
Open the battery compartment door. Take out the old battery. If the battery is difficult to remove, check if there is a small tab you need to press.
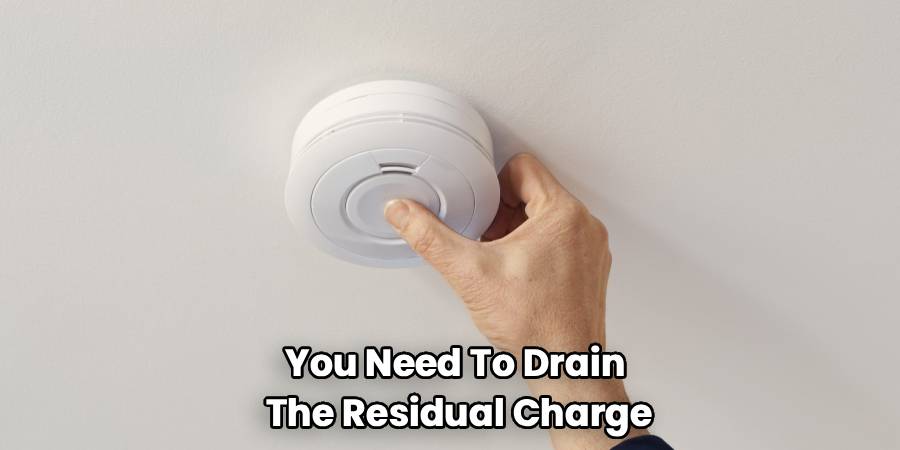
Press and Hold the Test Button
This is the crucial step that drains residual power. Press and hold the Test/Silence button for at least 15 seconds. You might hear a weak chirp or see the light flash briefly. This clears the processor’s memory completely.
Reassemble and Reconnect
Insert a fresh battery. Make sure the polarity (+ and -) matches the diagram. Reconnect the power harness. It usually only fits one way. Twist the unit back onto the mounting bracket.
Restore Power
Go back to your breaker box and flip the switch back on. The unit should chirp once to indicate it has power. The green light should be solid, indicating AC power is active.
Step-by-Step Guide: Resetting Battery-Only Models
These units are simpler because you don’t have to worry about circuit breakers.
Remove the Unit
Twist the detector off its mounting plate. You can usually do this by hand without tools.
Remove the Battery
Open the battery drawer or door. Take out the battery completely.
Discharge the Unit
Just like with the hardwired model, you need to drain the residual charge. Press and hold the Test button for 15 to 30 seconds. This ensures the internal capacitor is fully drained.
Install Fresh Power
Put in a brand-new, high-quality alkaline or lithium battery. Check the date on the battery package to ensure it’s fresh.
Test the Unit
Press the Test button quickly. The alarm should sound loud and clear. Mount it back on the ceiling or wall.
Dealing with Sealed 10-Year Lithium Models
These units are designed to be hassle-free, but when they malfunction, it can be confusing. You cannot change the battery in these units.
Permanent Deactivation vs. Reset
If a sealed unit is chirping due to a low battery, it usually means the unit has reached the end of its life. In this case, you cannot reset it to stop the chirping permanently; you must replace the unit. However, if it is a false alarm, you can hush it.
Using the Hush Button
Press the Hush/Silence button firmly. This will desensitize the unit for about 7 to 10 minutes. Use this if you burned dinner.
If It Won’t Stop Chirping
If a sealed unit is malfunctioning before the 10 years are up, you may need to permanently discharge it. Check the back for a “deactivation” switch or slot. Usually, you use a screwdriver to break a small tab or turn a switch.
Warning: Once you do this, the unit is dead and will never work again. Only do this if you are replacing it immediately.
Troubleshooting Persistent Chirps
You’ve followed the steps, but the noise continues. This is incredibly frustrating. Let’s look at why this happens.
The “Silent” Battery Drainer
Sometimes, the new battery you bought isn’t actually fresh. Batteries can sit on store shelves for a long time. Try a different brand or a different pack.
The Error Key
Some units have a safety feature called an “error key.” If the battery isn’t seated perfectly, a small plastic tab prevents the drawer from closing. Ensure the battery is snapped in all the way.
Dust and Debris
Over time, dust, cobwebs, or even tiny insects can get inside the sensing chamber. The sensor interprets this debris as smoke particles. Use a can of compressed air or a vacuum cleaner with a soft brush attachment. Clean around the openings of the device. Do this once a year to prevent false alerts.
Environmental Factors
Is the unit located near a bathroom? Steam can trigger it. Is it near a furnace vent? A blast of hot air can set it off. If you have consistent false alarms, consider moving the unit to a better location.
End of Life
Detectors don’t last forever. The sensors degrade over time. Most manufacturers, including Kidde, recommend replacing the entire unit every 10 years. Check the manufacturing date on the back. If it’s more than 10 years old, stop trying to fix it and buy a new one.
The Importance of the Green and Red Lights
Those little LED lights on your detector tell a story. Learning to read them can save you a lot of guessing.
Solid Green Light
This usually means the unit is receiving AC power (for hardwired units). This is good. It means your electrical connection is solid.
Flashing Red Light
A red flash every 30-60 seconds is normal for battery units. It shows it’s working. A rapid flashing red light usually means the unit is currently in alarm mode or has just detected smoke.
Specific Flash Patterns
Some modern units have “memory.” If the unit flashes green or red in a specific pattern (like 3 flashes, pause, 3 flashes), check the manual. It might be telling you specifically that it detected smoke, CO, or has a low battery.
Safety First: When Not to Reset
Never ignore an alarm if you aren’t 100% sure it’s false. If the alarm sounds and you don’t see smoke, feel the door for heat. Check for hidden fires, such as electrical fires behind walls.
Only reset the unit once you have confirmed there is absolutely no danger. If you have interconnected alarms, find the triggering unit. The triggering unit is usually the one flashing red rapidly while the others are just sounding the horn.
Maintenance Tips to Avoid Resets
The best way to handle a chirping detector is to prevent it from starting.
Weekly Tests
Press the test button every week. It takes two seconds and ensures the circuitry is active.
Bi-Annual Battery Swaps
Change the batteries every six months. Do it when you change your clocks for Daylight Saving Time. This prevents the low-battery chirp from ever happening.
Vacuum Regularly
Add “vacuum smoke detectors” to your spring cleaning list. It keeps the sensors clean and sensitive only to actual smoke.
Frequently Asked Questions
Here are answers to the most frequent questions homeowners have about these safety devices.
Why does my alarm chirp after I changed the battery?
This is the most common complaint. It usually happens because the error code is “stuck” in the processor. The unit still thinks the old, dead battery is installed. You must perform the hard reset (disconnect power, hold test button) to clear this memory. Also, ensure the new battery is fresh and snapped in tightly.
How do I stop the false alarms when cooking?
Do not take the battery out! This leaves you unprotected. Use the “Hush” button. It silences the unit for a few minutes. Turn on your range hood fan. Open a window. If it happens constantly, move the detector further away from the kitchen, but not too far.
What is the difference between ionization and photoelectric sensors?
Ionization sensors are better at detecting fast-burning fires (like paper or grease). Photoelectric sensors are better at detecting smoldering fires (like a couch catching a stray ember). Kidde makes dual-sensor alarms that have both. These are highly recommended for the best protection.
Can I replace a Kidde alarm with a different brand?
If you have battery-operated units, yes. If you are hardwired, it gets complicated. The wiring harness (plug) is specific to the brand.
You would need to change the plug on the wires in your ceiling. Also, interconnected alarms usually need to be the same brand to talk to each other correctly. It is generally easiest to stick with the same brand when replacing hardwired units.
What does three chirps mean?
Three long beeps, a pause, and three long beeps is the standard pattern for Smoke. Four rapid beeps usually indicates Carbon Monoxide (if it’s a combo unit). A single chirp every minute usually indicates Low Battery or End of Life.
How do I know if my unit is expired?
Take the unit down. Look at the back label. There will be a “Date of Manufacture” or “Mfg. Date.” Add 10 years to that date. If you are past that, replace it immediately.
Is the “Hush” button the same as a reset?
No. The Hush button temporarily desensitizes the alarm to ignore smoke for a short period. It is for managing known non-emergency sources like burnt toast. A reset is a full reboot of the system to clear errors and glitches.
Can cold weather make my alarm chirp?
Yes. Batteries work through chemical reactions. Cold temperatures slow these reactions down. If your alarm is near a drafty window or in a cold attic, the voltage might drop at night, causing a chirp. As the house warms up in the morning, the chirp might stop. This is a sign the battery is weak and needs replacing.
Conclusion
A chirping safety device is annoying, but it’s trying to tell you something. Usually, it just needs a little attention and a fresh start. Remember that knowing how to reset a Kidde smoke alarm involves more than just swapping a battery; you often need to drain the residual power to truly clear the system’s memory. By following these steps and keeping up with regular maintenance, you can ensure your home stays quiet and, more importantly, safe.
Don’t wait for the next 2 AM chirp—check your manufacturing dates and run a quick test on your units this weekend. Your peace of mind is worth the few minutes it takes.